

Keurig Coffee Maker All Lights Flashing – 6 Simple Steps (2026)
The Keurig coffee maker is a popular choice for coffee lovers who crave the convenience of a quick and easy cup of coffee. However, it can be frustrating when the machine malfunctions and all the lights start flashing.
This is a common issue that many Keurig users face, and it can be caused by a variety of factors. In this article, we will explore the possible reasons why a Keurig coffee maker has all lights flashing, as well as the steps you can take to fix the problem and get your machine brewing delicious coffee once again.
So, if you’re facing this issue with your Keurig coffee maker, read on to find out how to resolve it.
How to Fix when Keurig Coffee Maker Flashing Lights
If your Keurig coffee maker has blinking lights, it could be an indication that there is a problem with the machine that needs to be addressed. Here are some steps you can take to try and fix the issue:
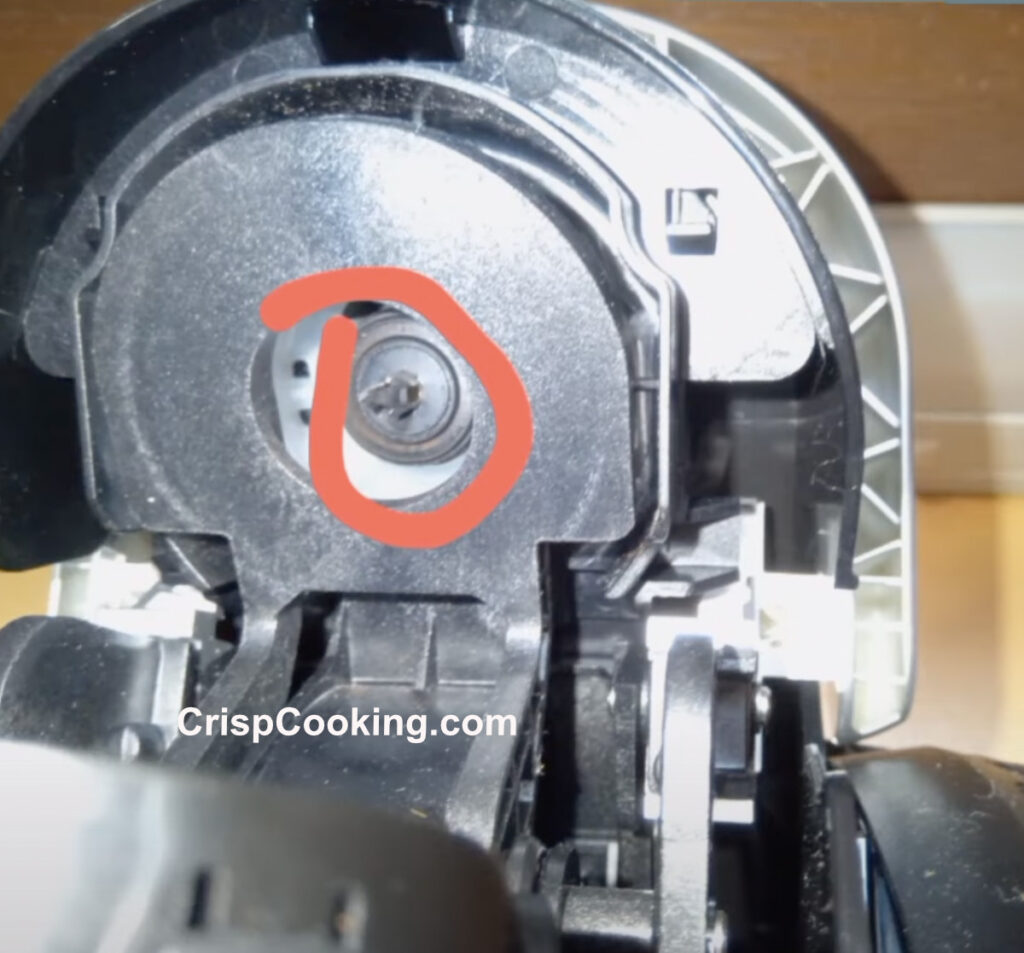
When a Keurig coffee maker has all lights on you should first try unclogging the needles. They get clogged with debris. In the following picture you can see where you have to clean.
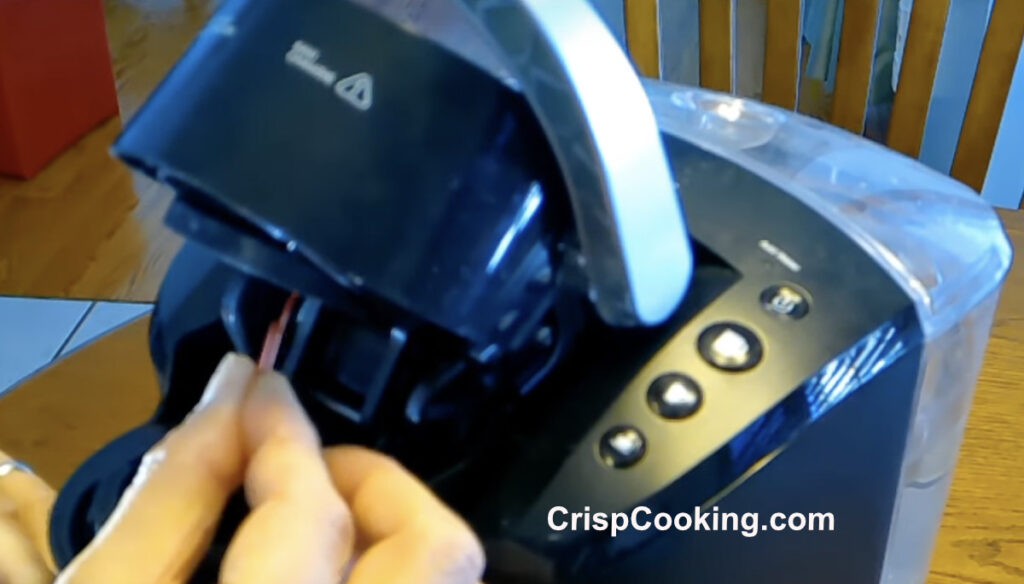
Grab a paper clip and unfold it. Check the following picture.
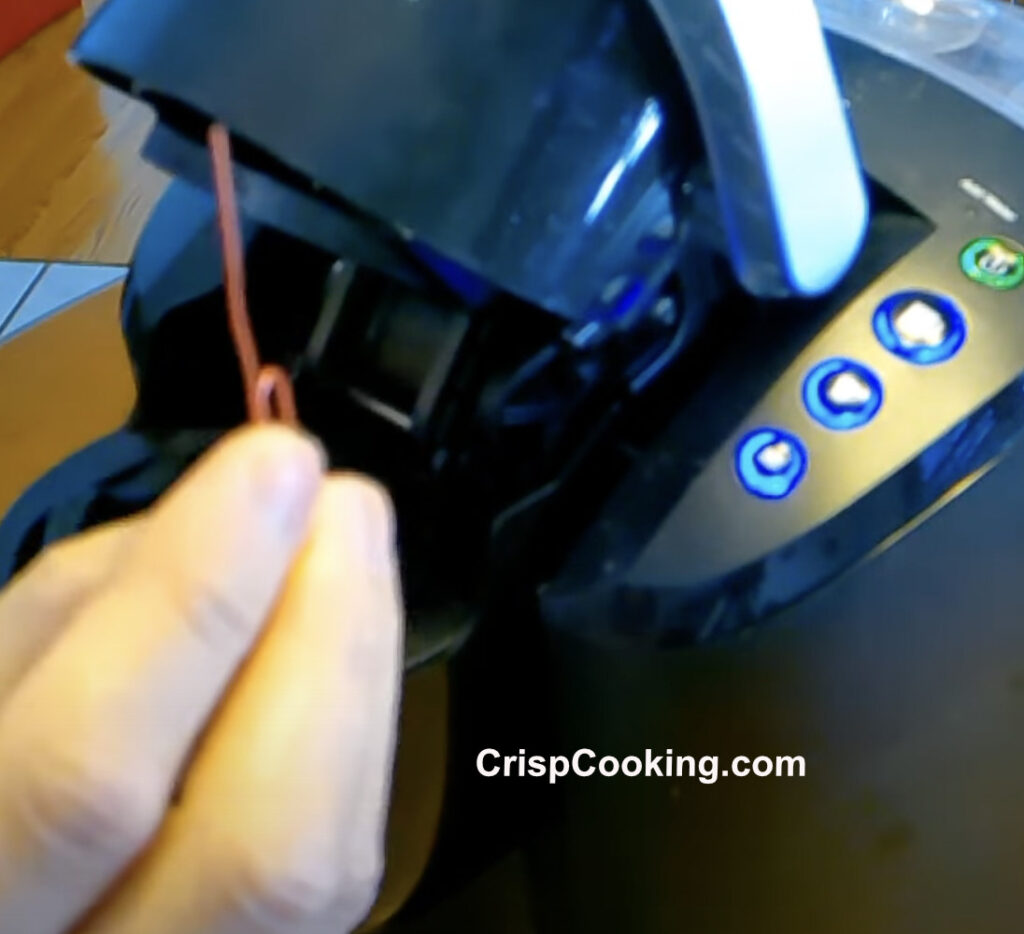
First unplug the Keurig machine from the wall outlet. Then press the paper clip throught the tiny holes to unclog them. Gently push the clip so as not to damage the coffee maker. Once you finish with all the tiny holes, plug the machine and turn it on.
If the previous steps don’t fix the problem try the following troubleshooting tips:
- Unplug the machine: Start by unplugging the Keurig coffee maker from the electrical outlet. This will help to reset the machine.
- Check the water reservoir: One of the most common reasons for blinking lights is a low water level. Check the water reservoir and ensure that it is properly seated and that the water level is adequate.
- Clean the machine: Remove the water reservoir, the K-cup holder, and the drip tray from the machine. Wash them all with soap and water, and dry them thoroughly.
- Restart the machine: Plug the Keurig back into the electrical outlet and power it on. Allow the machine to warm up, and then try to brew a cup of coffee to see if the problem has been resolved.
- Descale the machine: If the blinking lights persist, it may be time to descale the machine. Over time, minerals from the water can build up inside the machine and affect its performance. Use a descaling solution and follow the instructions in the user manual to descale the Keurig.
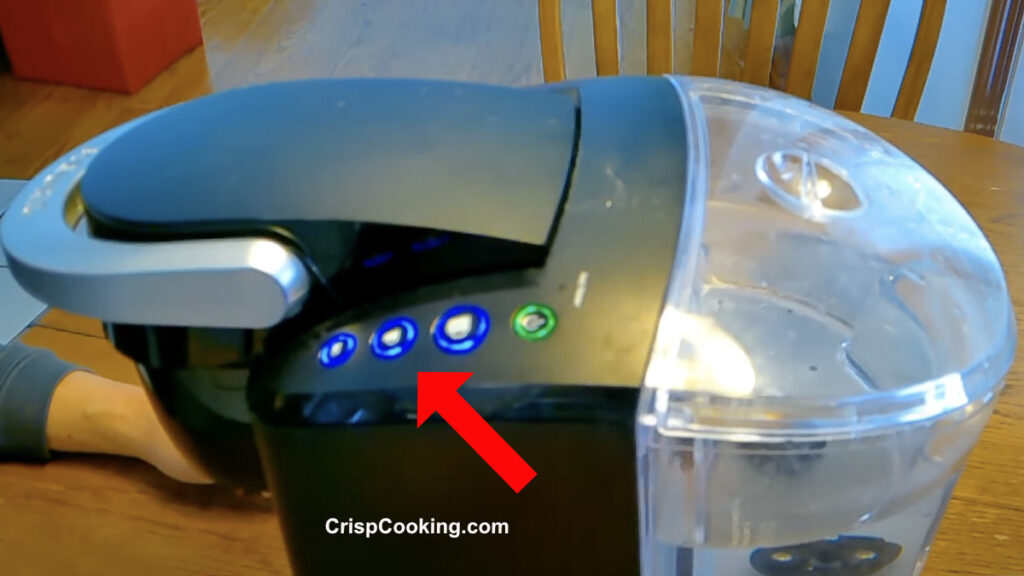
- Reset the machine: Press the “auto off” button and the 2 or 3 cup size buttons (depending on the Keurig model you own) at the same time for a couple of seconds, this should reset the machine. Most of the times this fixes the problem of all lights flashing
- Contact Keurig customer service: If none of the above steps work, you may need to contact Keurig customer service for further assistance. They may be able to troubleshoot the issue with you over the phone or provide a solution to fix the machine.
Blinking lights on a Keurig coffee maker can be frustrating, but there are several steps you can take to try and fix the issue. By following these steps, you can get your Keurig brewing delicious coffee once again.
Note that some Keurig coffee makers may have additional steps or unique features that require special attention. Consult the user manual or Keurig customer service for guidance specific to your machine.
Other Keurig Coffee Maker Troubleshooting Tips
Keurig Coffee Maker Lid Won’t Stay Closed
If your Keurig coffee maker lid won’t stay closed, there are several things you can try to fix the issue:
- Make sure the machine is turned off and unplugged: Before attempting any fixes, make sure the coffee maker is turned off and unplugged to ensure your safety.
- Check for obstructions: Check for any obstructions, such as coffee grounds or debris, that may be preventing the lid from closing properly. Use a soft, damp cloth to clean the area around the lid and remove any obstructions.
- Check the lid hinge: Check the lid hinge to ensure it is not broken or damaged. If it is, you may need to replace the lid or the entire coffee maker.
- Adjust the brewer handle: Adjust the brewer handle by lifting it up and pushing it back down firmly. This can sometimes help the lid latch properly.
- Check the alignment of the water reservoir: Check the alignment of the water reservoir to ensure it is seated correctly in the coffee maker. If it is not properly aligned, the lid may not latch properly.
- Contact Keurig customer service: If none of these solutions work, contact Keurig customer service for further assistance. They may be able to help diagnose the issue and offer a solution or provide a replacement lid or coffee maker if necessary.
By following these steps, you should be able to fix the issue of a Keurig coffee maker lid that won’t close.
Keurig Coffee Maker Not Pumping Water
If your Keurig coffee maker is not pumping water, there are several things you can try to fix the issue:
- Check the water reservoir: Check to make sure the water reservoir is filled with water and properly seated in the coffee maker. If the reservoir is empty or not properly seated, the machine may not be able to pump water.
- Check for clogs: Check for any clogs in the coffee maker’s water lines or needles. Use a paper clip or toothpick to gently clear any clogs you see.
- Run a cleaning cycle: Run a cleaning cycle on your Keurig coffee maker to remove any buildup that may be preventing the machine from pumping water. To run a cleaning cycle, fill the water reservoir with equal parts water and white vinegar, then run the machine as you normally would, but without a K-Cup pod in the holder.
- Descale the machine: If the cleaning cycle does not work, try descaling the machine. Descaling is the process of removing mineral buildup from the coffee maker’s internal components. Keurig recommends using their descaling solution, but you can also use a mixture of equal parts water and white vinegar. Follow the manufacturer’s instructions for descaling your specific model.
- Contact Keurig customer service: If none of these solutions work, contact Keurig customer service for further assistance. They may be able to help diagnose the issue and offer a solution or provide a replacement coffee maker if necessary.
By following these steps, you should be able to fix the issue of a Keurig coffee maker not dispensing water.
Keurig Coffee Maker Auto Off Set
To set the auto-off feature on your Keurig coffee maker, follow these steps:
- Turn on your Keurig coffee maker and make sure it is in idle mode (i.e., not brewing a cup of coffee).
- Press the “menu” button located on the control panel.
- Use the up and down arrow buttons to scroll through the menu options until you see “auto-off.”
- Press the “menu” button again to select the “auto-off” option.
- Use the up and down arrow buttons to select the amount of time you want your coffee maker to stay on before automatically shutting off. You can choose between “off,” “1 hour,” “2 hours,” and “4 hours.”
- Press the “menu” button again to confirm your selection and save the setting.
Your Keurig coffee maker will now automatically shut off after the specified amount of time. If you want to turn off the auto-off feature, simply repeat these steps and select “off” as the option for the amount of time.
Keurig Coffee Maker Just Shuts Off
If your Keurig coffee maker is shutting off unexpectedly, there may be several reasons why:
- Power supply issues: Check to make sure your coffee maker is plugged in properly and the outlet it is plugged into is working correctly. If the outlet is not working, try plugging the machine into a different outlet. Also, make sure the power cord is not damaged or frayed.
- Water supply issues: If the water supply to your coffee maker is interrupted, the machine may shut off automatically. Make sure the water reservoir is properly filled with water and seated correctly in the coffee maker.
- Overheating: Your coffee maker may be overheating if it is used for extended periods of time or if it is used frequently. Letting the machine cool down for a few minutes before using it again may help to prevent overheating.
- Clogs: If there is a clog in the machine’s water line or needles, the machine may shut off. Use a paper clip or toothpick to gently clear any clogs.
- Electrical issues: If the electrical components of your coffee maker are damaged or malfunctioning, the machine may shut off unexpectedly. In this case, you may need to contact Keurig customer service or consider replacing the machine.
If none of these solutions work, contact Keurig customer service for further assistance. They may be able to help diagnose the issue and offer a solution or provide a replacement coffee maker if necessary.
Keurig Coffee Maker Not Brewing Full Cup
If your Keurig coffee maker is not brewing a full cup, there may be several reasons why:
- Water supply issues: Make sure the water reservoir is properly filled with water and seated correctly in the coffee maker. If the reservoir is not properly filled, the machine may not be able to brew a full cup.
- Clogs: Check for any clogs in the coffee maker’s water lines or needles. Use a paper clip or toothpick to gently clear any clogs you see. Clogs can prevent the machine from brewing a full cup of coffee.
- Brew setting: Check the brew setting on your Keurig coffee maker. If it is set to a smaller cup size, it will not brew a full cup of coffee. Adjust the brew setting to a larger cup size.
- Descale the machine: Mineral buildup in the machine’s internal components can prevent the machine from brewing a full cup of coffee. Try descaling the machine to remove any buildup. Keurig recommends using their descaling solution, but you can also use a mixture of equal parts water and white vinegar. Follow the manufacturer’s instructions for descaling your specific model.
- Contact Keurig customer service: If none of these solutions work, contact Keurig customer service for further assistance. They may be able to help diagnose the issue and offer a solution or provide a replacement coffee maker if necessary.
By following these steps, you should be able to fix the issue of a Keurig coffee maker not brewing a full cup.
Keurig Coffee Maker Descale Light Won’t Turn Off
If the descale light on your Keurig coffee maker won’t turn off after descaling, there may be a few reasons why:
- Incomplete descaling: If the descale light is still on after descaling, it’s possible that the descaling process was not completed properly. Follow the manufacturer’s instructions carefully to ensure that you fully descale the machine.
- Improper descaling solution: If you used a descaling solution that is not recommended by Keurig, it’s possible that the descale light will not turn off. Keurig recommends using their own descaling solution, which is formulated to work specifically with their machines.
- Residue buildup: If there is a buildup of mineral residue inside the machine, the descale light may continue to stay on even after descaling. Try descaling the machine again, using a bit more descaling solution than recommended, to see if this helps remove any leftover buildup.
- Technical issue: If none of the above solutions work, there may be a technical issue with the machine. In this case, contact Keurig customer service for further assistance. They may be able to help diagnose the issue and offer a solution or provide a replacement coffee maker if necessary.
Overall, it’s important to keep up with regular descaling to keep your Keurig coffee maker working properly. If you are unable to turn off the descale light after descaling, try one of the above solutions or contact Keurig customer service for assistance.
FAQs on Keurig Coffee Maker All Lights Flashing
How to fix a Keurig Coffee Maker Blinking Lights?
Try the following steps to fix your Keurig Coffee maker with blinking lights:
1. Unplug the machine
2. Check the water reservoir
3. Clean the machine
4. Restart the machine
5. Descale the machine
6. Contact Keurig customer service
See the detailed steps in the current article above.
How to fix keurig coffee maker all lights on?
Try the same steps in the article above. The steps are the following:
1. Unplug the machine
2. Check the water reservoir
3. Clean the machine
4. Restart the machine
5. Descale the machine
6. Contact Keurig customer service
How to fix keurig coffee maker not working all lights on
If your Keurig coffee maker is not working and has all lights on, follow these steps:
1. Unplug the machine
2. Check the water reservoir
3. Clean the machine
4. Restart the machine
5. Descale the machine
6. Contact Keurig customer service
See the detailed steps in the current article above.
What causes all lights to flash on a Keurig coffee maker?
All lights flashing on a Keurig coffee maker is usually an indication that there is a problem with the machine. This could be caused by a variety of factors, including a low water level, clogs or debris in the machine, or mineral buildup from the water.
How often should I descale my Keurig?
Keurig recommends descaling your machine every three to six months, depending on usage and water quality. However, if you notice a buildup of mineral deposits or your machine is not working properly, you may need to descale more frequently.
How can I fix my Keurig if all lights are flashing?
You can try several steps to fix your Keurig if all lights are flashing, including cleaning the machine, checking the water reservoir, restarting the machine, and descaling the machine. If none of these steps work, you may need to contact Keurig customer service for further assistance.
Can I use vinegar to descale my Keurig?
While vinegar is a popular DIY solution for descaling Keurig machines, it is not recommended by Keurig. Vinegar can leave a strong odor and taste in your machine and may damage the internal components. Keurig recommends using a descaling solution specifically designed for their machines.
Why is my Keurig still flashing lights after cleaning and descaling?
If your Keurig is still flashing lights after cleaning and descaling, it may indicate a more serious problem with the machine, such as a malfunctioning sensor or a faulty heating element. In this case, you may need to contact Keurig customer service for further assistance.
Final Thoughts
In conclusion, a Keurig coffee maker with all lights flashing can be a frustrating experience for any coffee lover. However, by following the steps outlined in this article, you can often resolve the issue and get your machine brewing delicious coffee once again.
Remember to check the water reservoir, clean the machine, restart it, descale it, and contact Keurig customer service if needed. With proper maintenance and care, your Keurig coffee maker can provide you with many cups of delicious coffee for years to come.

Hello, I am Cristy. I love cooking but what I love most is keeping my kitchen tools and appliances top notch. I enjoy writing about everything I have learned around the kitchen. I believe that keeping your kitchen tools well cleaned and maintained produces the best dishes and drinks. Besides writing and cooking I enjoy traveling, camping, hiking and music.